Car Setup
Wiring the power supply into your car:
To install the switch/power supply in your car there are just three wires that need to be hooked up: the long black, red, and yellow wires that are connected to the green jumper block on the PCB. The easiest place for most people to hook these wires up is in their dash / behind their stereo. Not all cars use the same color wiring combination, but the switch wires are to be connected as follows:
Black wire to ground.
Yellow wire to constant +12V/battery source.
Red wire to ignitition/accessory/switched +12V source.
Please make sure of the following:
Your ground connection should be a strong ground. Please don't ground into a tiny wire.
The switches (both the 2amp and 3amp) are prone to getting warm if driven near max current rating. If you plan to draw a lot of current from your switch then please make sure you have adequate ventilation for your switch!
Connecting the switch to your Raspberry Pi
On the circuit PCB you will notice the two leads are labeled "in" and "out."
Connect a micro-USB cable from the circuit's USB port to the power port of your Raspberry Pi (or, if you have a direct-plug circuit, directly to your Pi) and when you turn on your ignition the Pi should power on.
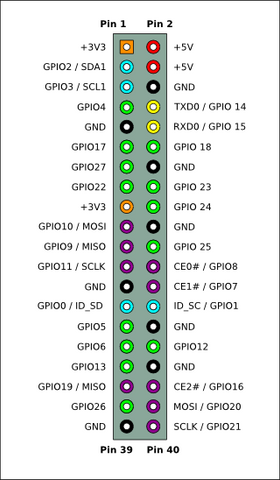
Using the Pi GPIO header diagram at right, connect the "out" lead to GPIO 23 and "in" lead to GPIO 24. If you prefer to use other pins (e.g. GPIO 5 and 6) simply edit the script as discussed later in the setup. Do not connect to a ground or power GPIO pin. GPIO 0 and 1 can sometimes cause issues as well.
You can use either keyboard input or SSH to install the script for the switch
If you have a keyboard connected to your Pi then you can type the instructions listed below into the command line, there is no need to use SSH. The Pi must have internet access during installation (but not needed after) for setup. To access command line in RaspBMC, go to the power icon and then select exit.
For SSH, recommend using Putty (www.putty.org) or WinSCP (winscp.net), both free.
To SSH into your Pi, find the Pi's IP address provided by your router and enter it in the SSH client (use port 22). Common log-ins are:
- RaspBMC/Raspbian
- user: pi password: raspberry
- OpenELEC
- user: root password: openelec
- Xbian
- user: root password: raspberry
- Arch
- user: root password: root
Installing the script
For RaspBMC/Raspbian/Debian distributions (Xbian as well, omit the word sudo), type the following and hit enter after each line:
1. wget http://files.mausberrycircuits.com/carsetup.sh
2. sudo bash carsetup.sh
3. sudo reboot
For OpenELEC:
1. wget http://files.mausberrycircuits.com/carsetupOE.sh
2. bash carsetupOE.sh
3. reboot
For Arch:
1. wget http://files.mausberrycircuits.com/carsetupArch.sh
2. bash carsetupArch.sh
3. reboot
After the Raspberry Pi has fully rebooted, your switch is now ready for use!
To add a shutdown delay or use a different GPIO pin:
RaspBMC/Raspbian/Debian:
1. sudo nano /etc/switch.sh
OpenELEC:
1. nano /storage/.config/switch.sh
Arch:
1. nano /etc/switch.sh
For the delay, at the top of the script change delay=0 to the number of minutes you'd like to delay shutdown.
To use different GPIO pins change "GPIOpin1=23" and "GPIOpin2=24" to the pins of your choice as numbered in the header diagram above.